

Place each photo booth on a distinct natural flow path with its own service footprint, and your event won’t have lines. That means roughly 8 to 10 feet of dedicated space per booth, a 6-foot two-way clearance for guests to pass, its own power source, and a staffed queue area that doesn’t collide with another booth’s crowd.
A single booth handles about 150 to 200 guests comfortably before wait times start climbing. Once you’re past that number, or running a wedding with a cocktail hour and an after-dinner rush, you need a second station and a plan for where each one sits. Vendor coordination matters just as much as placement: separate circuits, separate staff, and a shared understanding of who reloads props at 9 p.m.
Pro Tip: Sketch your venue map first, then place booths, not the reverse. A floor plan built around guest movement, the same approach Zoho Backstage recommends for avoiding dead-end aisles, prevents 90% of the congestion problems planners call us about after the fact.
At ZATTU PHOTO BOOTH, we recommend a minimum 6-foot aisle width for two-way traffic between stations, whether you’re running a 150-guest wedding or a 600-person gala.
Key Takeaways
A multi-booth event floor plan works when each station sits on its own flow path with an 8 to 10 foot footprint, 6-foot clearances, dedicated power, and a staffed queue.
| Point | Details |
|---|---|
| One booth per flow path | Avoid clustering stations on the same route; zone them to serve different guest segments. |
| Footprint and clearance minimums | Plan 8×8 to 10×10 ft per booth, 6-foot two-way aisles, and 6 to 10 ft of queue space. |
| Power and connectivity per station | Give each booth its own circuit where possible, with printers within 25 to 50 ft of outlets. |
| Scale booth count to guest volume | One booth serves up to 150 to 200 guests; add stations for larger or multi-room events. |
| Protect sightlines and exits | Keep backdrops, signage, and queues clear of emergency exits and wayfinding markers. |
Table of Contents
- Multi-booth event floor plan checklist for your venue map
- What planning inputs do you need before sketching booth placements?
- Where should you place each photo booth for the best flow?
- Layout templates for small, medium, and large events
- Power, printers, and staffing on event day
- What are the biggest booth placement mistakes to avoid?
- What George Zattu checks on every site visit
- Frequently asked questions
- Sources
Multi-booth event floor plan checklist for your venue map
Before you approve any layout, mark up your venue sketch with these checks:
Venue and space verification:
- Confirm the scaled floor plan matches current room dimensions, not last year’s version.
- Calculate usable square footage after subtracting fixed elements.
- Flag every fixed obstruction: doors, columns, stages, bars, kitchen pass-throughs, restrooms.
Circulation and clearance checks:
- Trace the primary paths guests will walk between entrance, bar, and dance floor or main hall.
- Confirm each booth footprint is at least 8×8 ft, with 6 to 10 ft of queue allowance in front.
- Check sightlines from exits and wayfinding signs. Nothing should block an exit sign or directional marker.
- Verify power and circuit access within reach of each booth location.
- Test Wi-Fi range at the proposed spot, not just near the router.
- Confirm ADA-compliant clearances along every route a booth sits near.
Sign-off and vendor questions:
Venue operations should sign off on structural placement, an electrician confirms circuit capacity, and your booth vendor confirms staffing and backup gear. Ask for a circuit map, cable-cover plan, and attendant headcount before the contract is final.
What planning inputs do you need before sketching booth placements?
You can’t place a booth accurately without four things in hand first: a scaled floor plan, your guest count by time block, your power map, and your accessibility requirements. Skipping any one of these means redrawing the plan on event day, usually while guests are already arriving.
Venue assets to collect:
- A scaled floor plan showing fixed obstructions: doors, columns, stages, bars, kitchens, restrooms.
- Ceiling height and any sightline constraints from hanging décor or drape.
- Load-in routes and staging access points for vendor equipment.
Operational inputs:
- Expected headcount per time block, since a dinner crowd and a dance-floor crowd move differently.
- The event schedule, with cocktail hour and post-dinner peaks marked.
- Whether the priority is printed keepsakes, digital sharing, or both.
- Accessibility requirements for guests using mobility devices.
Technical inputs:
- Power locations and a circuit map showing what else draws from each source.
- Wi-Fi and backhaul availability at each candidate location.
- Vendor-supplied equipment footprints. ZATTU PHOTO BOOTH provides exact dimensions during package planning so you’re not guessing.
Bring all three categories to your first venue walk-through. It’s the difference between a 20-minute site visit and a three-hour one.
Where should you place each photo booth for the best flow?
Five rules govern good booth placement, and they apply whether you’re running two stations or six.
- Follow natural flow. Place booths along desire lines between major destinations, entrance to bar, registration to main hall, not off to one side where guests have to detour to find them.
- Avoid competition between booths. Space stations so each serves a different segment of the crowd rather than fighting over the same 20 feet of floor. Zone by activity: one booth near the reception entrance, another near the lounge.
- Respect footprint and clearance minimums. Each booth needs at least 8×8 ft of space, ideally 10×10 ft, plus 6 feet of two-way aisle and 6 to 10 feet of queue room. Keep backdrops and signage out of exit sightlines.
- Plan power and connectivity per booth. Each station needs its own reliable circuit where possible, printers within 25 to 50 feet of an outlet, and bandwidth that can handle simultaneous photo uploads without lag.
- Protect accessibility and safety. Never let a booth, its queue, or its backdrop block an ADA route, an emergency exit, or a wayfinding sign.
High-traffic intersections near food stations, main stages, or restrooms can generate 40 to 60% more engagement than an isolated corner. That’s the single best argument for putting your primary booth where people already gather, not where there happens to be empty floor.
Pro Tip: Split your high-demand features across zones instead of stacking them in one booth. Put a lively, high-energy station near the dance floor or bar to catch the after-dinner surge, and place a quieter glam or premium studio booth near the lounge or VIP area where guests want fewer people watching.
Layout templates for small, medium, and large events
Three sizes cover almost every event we set up across a season, and each one maps directly to a booth count and zone strategy.
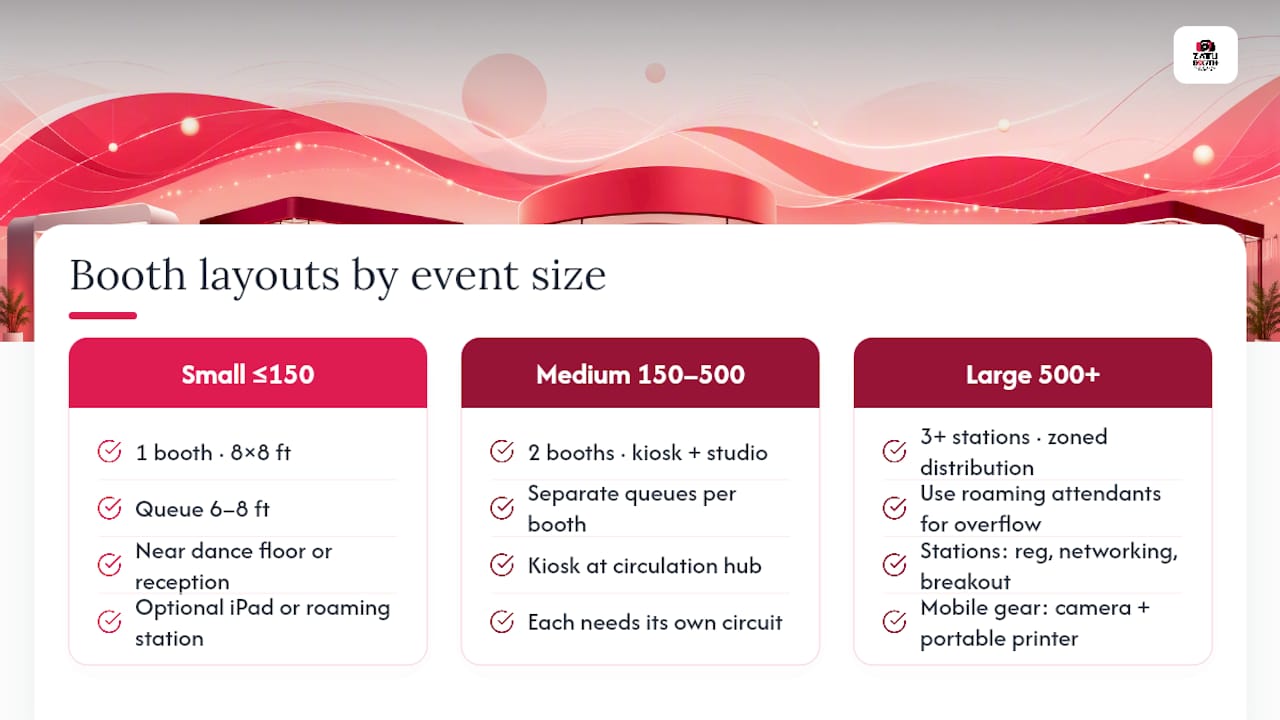
Small events (150 guests or fewer): One primary booth, a studio or glam setup, positioned near the dance floor or reception perimeter with an 8×8 ft footprint and 6 to 8 ft of queue space. Add an optional iPad or roaming station near the entrance for guests who arrive before the main event starts.
Medium events (150 to 500 guests): Two complementary booths. Put a high-visibility mirror booth or selfie kiosk at the main circulation hub, near the bar or between the ceremony and reception spaces, and a quieter premium studio booth near the lounge or foyer. Each needs its own circuit, and you’ll want one attendant per booth minimum.
Large events (500-plus guests or multi-room venues): Three or more stations distributed by zone: one near registration, one at the central networking area, one on the breakout floor. For conferences above 5,000 attendees, plan for at least two to three stations to keep wait times under four minutes. Add roaming attendants with mobile gear to cover overflow instead of a fourth fixed booth.
Roaming booths make more sense than a fixed fourth station once your floor plan spans multiple rooms. A fixed booth can’t follow the crowd from cocktail hour into the main hall. A roaming attendant with a mirrorless camera and a portable printer can.
Power, printers, and staffing on event day
Your placement plan only works if the technical side holds up. Confirm outlet locations and circuit capacity for every booth, and request temporary power distribution or a small UPS for any station you can’t afford to lose mid-event.
- Estimate bandwidth needs for simultaneous photo uploads across all booths, not just one.
- Keep authentication and printer connectivity consistent across stations to avoid troubleshooting three different setups.
- Staff at least one attendant per active booth, plus a floater for queue management and quick reloads.
- Confirm load-in windows, staging areas, and prop storage with the venue ahead of time.
- Build in printer redundancy and a load-balancing plan for unexpected surges.
Pro Tip: Ask your vendor for a written contingency plan before you sign. ZATTU PHOTO BOOTH carries backup printers and a direct line to venue tech teams on every multi-booth booking, which matters far more at 9 p.m. than it does on the proposal page.
What are the biggest booth placement mistakes to avoid?
Watch for these on a venue walk-through or during event-day setup:
- Booths clustered on the same flow path cannibalize each other’s traffic. Move one to a complementary zone.
- Backdrops or tall sponsor elements blocking exit signage. Lower or relocate anything taller than eye level near exits.
- Shared circuits causing stalls. Request a dedicated circuit or bring a small UPS as backup.
- No queue space near food or restrooms. Add stanchions or shift the booth to the perimeter of that congregation point.
Most of these are fixable in ten minutes with cable ramps, a signage reroute, or reassigned staff, but only if someone catches them before doors open.
What George Zattu checks on every site visit
Three things tell me whether a floor plan will hold up: how guests actually move through the space (not how the diagram says they will), whether each booth’s circuit is confirmed in writing, and a clean staff handoff so nobody’s guessing who’s covering a queue at 8 p.m. We run every booth on Nikon full-frame mirrorless gear with professional lighting, and we walk every multi-booth venue in person before quoting a layout.
Getting your layout right before the event starts is worth more than any last-minute fix. If you’re planning a wedding, gala, or corporate reception with more than one activation, book a consultation with ZATTU PHOTO BOOTH and we’ll walk your venue map with you, confirm circuits and clearances, and recommend a booth mix built for your guest count. For corporate galas specifically, our corporate photo booth packages include the vendor coordination notes venue operations teams ask for.
Frequently asked questions
How many photo booths do I need for a 300-guest wedding or gala?
Two booths is the right call once you’re past roughly 200 guests. Place one at the main circulation hub, like the bar or reception entrance, and a quieter second booth in a lounge or foyer area to avoid crowd overlap.
What is the minimum space required for a multi-booth event floor plan?
Each booth needs at least 8×8 ft, with 10×10 ft preferred for comfort. Add 6 feet of two-way aisle clearance between stations and 6 to 10 feet of queue allowance in front of each one.
Can two photo booths share the same power circuit?
It’s not recommended. Shared circuits are the most common cause of mid-event stalls. Request separate circuits per booth, or bring a small UPS as backup for any station you can’t afford to lose.
Where should I avoid placing photo booths at a large event?
Avoid dead-end aisles, direct sightlines to emergency exits, and areas competing with food or bar lines for space. Those spots either get skipped by guests or create dangerous congestion.
Do I need different booth types for different zones?
Yes, generally. A high-visibility mirror booth or kiosk works well at a main hub, while a premium studio or glam booth suits a quieter lounge zone. ZATTU PHOTO BOOTH’s glam booth and selfie kiosk options are built for exactly this kind of zoning.
Sources
- Plan your event floor (Zoho Backstage)
- Photobooth Fest: Ultimate Guide for Event Professionals – Pixilated
- Photo booth for a 10,000-person conference: what it actually takes